> ## Documentation Index
> Fetch the complete documentation index at: https://docs.reelevant.com/llms.txt
> Use this file to discover all available pages before exploring further.
# Overview
> Import and use external data in your workflows with data nodes
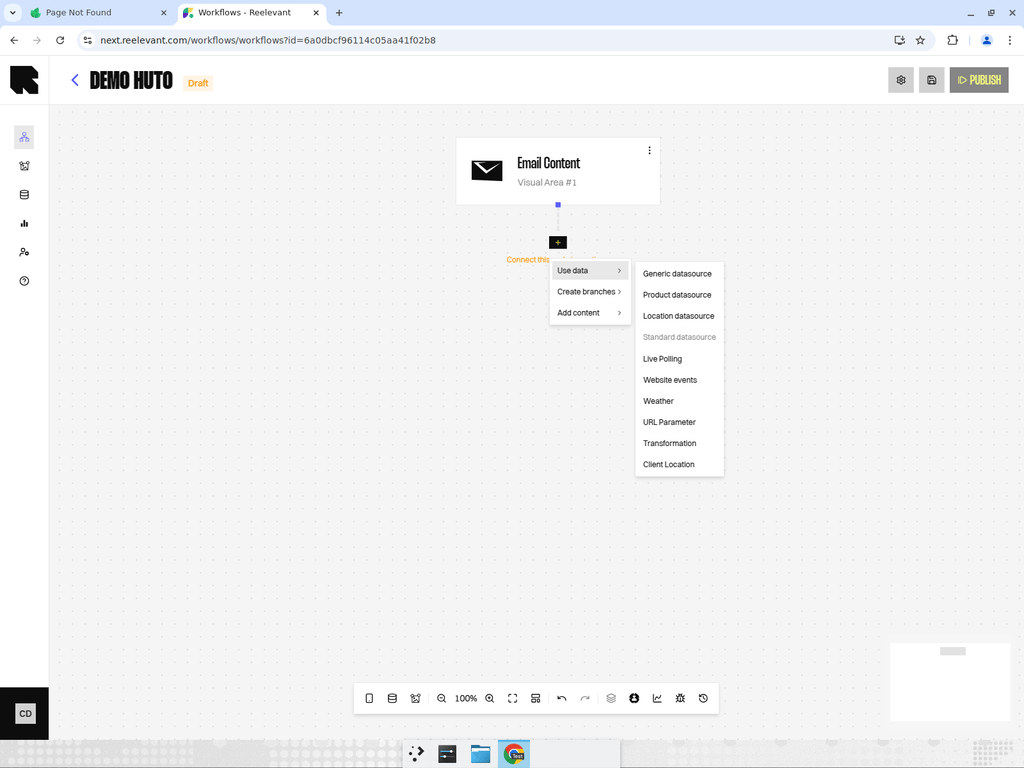 ## What are Data Nodes?
Data nodes bring external data into your workflow. They fetch, filter, and transform information from your datasources, URL parameters, geolocation services, weather APIs, and more. This data is then available to downstream [logic](/product-guide/workflows/logic-nodes) and [output](/product-guide/workflows/output-nodes) nodes for personalization.
## Adding a Data Node
1. Hover over the **Data** button (database icon) in the bottom toolbar.
2. A menu appears listing all available data node types.
3. Click on the desired type to open its configuration drawer.
Alternatively, right-click on an existing node and select **Use data** to add a data node downstream.
## Data Node Types
Connect to data imported in DataHub — generic, product, and location datasources.
Capture values passed via the URL when the workflow is executed.
Resolve the user's geographic location based on their IP address.
Fetch current weather data for the user's location.
Retrieve user behavior data from your website tracking.
Return the current click share for a Branch.
Apply data transformations to values from other nodes.
## Filtering and Ordering
Most datasource nodes support **filters** and **ordering**:
### Filters
Add one or more filter rules to narrow down results:
* **Field** — Select which datasource field to filter on.
* **Operator** — Choose a comparison operator (equals, contains, greater than, etc.).
* **Value** — Provide a static value or reference data from another node in the workflow.
### Ordering
Choose how results are sorted:
* **Default order** — As stored in the datasource.
* **Ascending / Descending** — Sort by a specific field.
* **Change every 10 seconds for everyone** — Randomize results periodically for all users.
* **Change for each person** — Each user sees a different order.
## Using Data Downstream
Once a data node is configured, its output fields become available to all downstream nodes through the **Variable Picker**. The variable picker organizes available data by source:
* **Context** — Standard context data (user, device, time).
* **Geolocation** — Location data from the Geolocation node.
* **Workflow data** — Data from upstream data nodes, labeled by the datasource name.
* **Import new data** — Quickly add a new data node if the data you need isn't available yet.
## What are Data Nodes?
Data nodes bring external data into your workflow. They fetch, filter, and transform information from your datasources, URL parameters, geolocation services, weather APIs, and more. This data is then available to downstream [logic](/product-guide/workflows/logic-nodes) and [output](/product-guide/workflows/output-nodes) nodes for personalization.
## Adding a Data Node
1. Hover over the **Data** button (database icon) in the bottom toolbar.
2. A menu appears listing all available data node types.
3. Click on the desired type to open its configuration drawer.
Alternatively, right-click on an existing node and select **Use data** to add a data node downstream.
## Data Node Types
Connect to data imported in DataHub — generic, product, and location datasources.
Capture values passed via the URL when the workflow is executed.
Resolve the user's geographic location based on their IP address.
Fetch current weather data for the user's location.
Retrieve user behavior data from your website tracking.
Return the current click share for a Branch.
Apply data transformations to values from other nodes.
## Filtering and Ordering
Most datasource nodes support **filters** and **ordering**:
### Filters
Add one or more filter rules to narrow down results:
* **Field** — Select which datasource field to filter on.
* **Operator** — Choose a comparison operator (equals, contains, greater than, etc.).
* **Value** — Provide a static value or reference data from another node in the workflow.
### Ordering
Choose how results are sorted:
* **Default order** — As stored in the datasource.
* **Ascending / Descending** — Sort by a specific field.
* **Change every 10 seconds for everyone** — Randomize results periodically for all users.
* **Change for each person** — Each user sees a different order.
## Using Data Downstream
Once a data node is configured, its output fields become available to all downstream nodes through the **Variable Picker**. The variable picker organizes available data by source:
* **Context** — Standard context data (user, device, time).
* **Geolocation** — Location data from the Geolocation node.
* **Workflow data** — Data from upstream data nodes, labeled by the datasource name.
* **Import new data** — Quickly add a new data node if the data you need isn't available yet.