> ## Documentation Index
> Fetch the complete documentation index at: https://docs.reelevant.com/llms.txt
> Use this file to discover all available pages before exploring further.
# Content Script & On-site Integration
> Configure client-side on-site integrations on your website using the browser extension content script
 ## Overview
The content script is the part of the browser extension that runs on your website pages. It lets you configure **on-site integrations** — client-side placements where the Reelevant tracking script injects personalised content into a specific DOM element.
This is the no-code counterpart to manual [Client Side Script](/developer-docs/web-integration/client-side-script/overview) integration. The content script UI writes the integration configuration to your workflow so the tracking script can load content on matching pages.
## Opening the on-site integration UI
1. Log in to the extension and open a [workflow](/product-guide/browser-extension/workflows) with a client-side channel.
2. Navigate to the page on your website where the integration should run.
3. Open the on-site integration panel for the target channel zone.
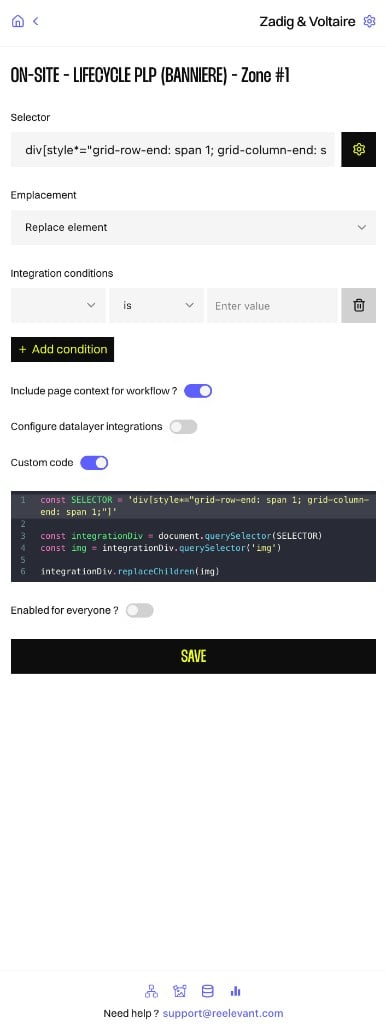
The panel title shows the workflow, channel, and zone name (for example, `ON-SITE - LIFECYCLE PLP (BANNIERE) - Zone #1`).
## Configurable fields
The extension only exposes the settings available in the on-site integration UI:
| Field | Description |
| -------------------------------------- | ------------------------------------------------------------------------------------------------------------------------------------------------------------------------------------------------------------------------- |
| **Selector** | CSS selector for the target DOM element. Type a selector manually or use the gear icon to pick an element visually on the page. |
| **Emplacement** | How content is inserted relative to the target element (for example, **Replace element**). |
| **Integration conditions** | Rules that control when the integration is active. Each condition has a variable, an operator (for example, **is**), and a value. Click **Add condition** to add more rules, or delete existing ones with the trash icon. |
| **Include page context for workflow?** | When enabled, sends page context to the workflow so it can use URL and page-level data. |
| **Configure datalayer integrations** | When enabled, exposes datalayer variable mapping for the integration. |
| **Custom code** | When enabled, shows a code editor where you can write JavaScript to customize how the integration interacts with the page DOM. |
| **Enabled for everyone?** | When enabled, the integration runs for all visitors. When disabled, it is limited to users matching your workflow targeting rules. |
Click **Save** to persist the configuration to the workflow.
## DOM selector
Click the gear icon next to the **Selector** field to activate the visual DOM selector on the current page. Hover over elements to highlight them, then click to select one. The generated CSS selector is inserted into the **Selector** field.
The DOM selector works on any website you navigate to while the extension is active. Make sure you are on the correct page where you want the Reelevant content to appear.
## How it fits with client-side integration
On-site integrations configured through the extension are consumed by the Reelevant client-side tracking script at runtime. The script scans the page, matches active integrations against the current URL and conditions, and injects workflow output into the configured selector.
For script installation, identity management, datalayer usage, and other client-side concepts, see [Client Side Script](/developer-docs/web-integration/client-side-script/overview).
## Overview
The content script is the part of the browser extension that runs on your website pages. It lets you configure **on-site integrations** — client-side placements where the Reelevant tracking script injects personalised content into a specific DOM element.
This is the no-code counterpart to manual [Client Side Script](/developer-docs/web-integration/client-side-script/overview) integration. The content script UI writes the integration configuration to your workflow so the tracking script can load content on matching pages.
## Opening the on-site integration UI
1. Log in to the extension and open a [workflow](/product-guide/browser-extension/workflows) with a client-side channel.
2. Navigate to the page on your website where the integration should run.
3. Open the on-site integration panel for the target channel zone.
The panel title shows the workflow, channel, and zone name (for example, `ON-SITE - LIFECYCLE PLP (BANNIERE) - Zone #1`).
## Configurable fields
The extension only exposes the settings available in the on-site integration UI:
| Field | Description |
| -------------------------------------- | ------------------------------------------------------------------------------------------------------------------------------------------------------------------------------------------------------------------------- |
| **Selector** | CSS selector for the target DOM element. Type a selector manually or use the gear icon to pick an element visually on the page. |
| **Emplacement** | How content is inserted relative to the target element (for example, **Replace element**). |
| **Integration conditions** | Rules that control when the integration is active. Each condition has a variable, an operator (for example, **is**), and a value. Click **Add condition** to add more rules, or delete existing ones with the trash icon. |
| **Include page context for workflow?** | When enabled, sends page context to the workflow so it can use URL and page-level data. |
| **Configure datalayer integrations** | When enabled, exposes datalayer variable mapping for the integration. |
| **Custom code** | When enabled, shows a code editor where you can write JavaScript to customize how the integration interacts with the page DOM. |
| **Enabled for everyone?** | When enabled, the integration runs for all visitors. When disabled, it is limited to users matching your workflow targeting rules. |
Click **Save** to persist the configuration to the workflow.
## DOM selector
Click the gear icon next to the **Selector** field to activate the visual DOM selector on the current page. Hover over elements to highlight them, then click to select one. The generated CSS selector is inserted into the **Selector** field.
The DOM selector works on any website you navigate to while the extension is active. Make sure you are on the correct page where you want the Reelevant content to appear.
## How it fits with client-side integration
On-site integrations configured through the extension are consumed by the Reelevant client-side tracking script at runtime. The script scans the page, matches active integrations against the current URL and conditions, and injects workflow output into the configured selector.
For script installation, identity management, datalayer usage, and other client-side concepts, see [Client Side Script](/developer-docs/web-integration/client-side-script/overview).