> ## Documentation Index
> Fetch the complete documentation index at: https://docs.reelevant.com/llms.txt
> Use this file to discover all available pages before exploring further.
# Analytics Settings
> Configure attribution, personalisation exposure thresholds and custom tags for your company
 ## Overview
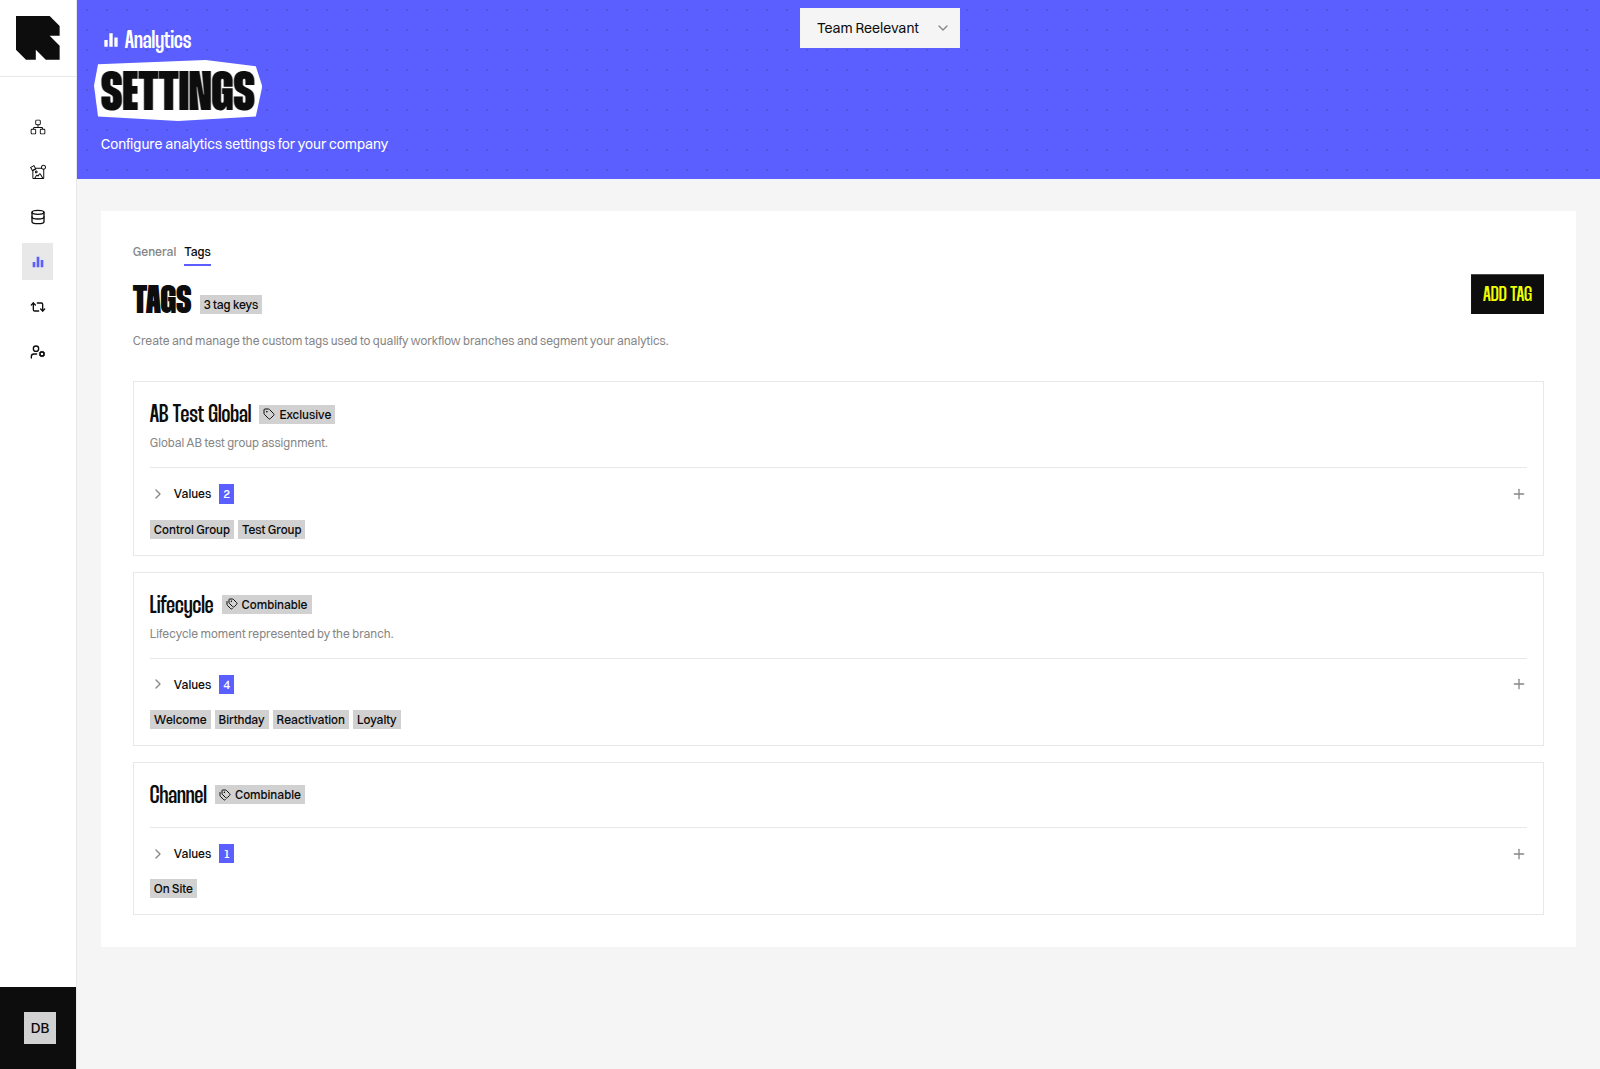
The Analytics Settings page lets you configure attribution, personalisation exposure and custom tags for your company. Use tags to qualify Branches and segment Analytics.
Access it from the **Settings** link in the Analytics sidebar navigation.
## Attribution
Attribution decides how much revenue your Reelevant [workflows](/product-guide/workflows/overview) helped generate. Here you choose the model, the lookback windows, and the data source. See [Attribution](/product-guide/analytics/attribution) for a full explanation.
## Overview
The Analytics Settings page lets you configure attribution, personalisation exposure and custom tags for your company. Use tags to qualify Branches and segment Analytics.
Access it from the **Settings** link in the Analytics sidebar navigation.
## Attribution
Attribution decides how much revenue your Reelevant [workflows](/product-guide/workflows/overview) helped generate. Here you choose the model, the lookback windows, and the data source. See [Attribution](/product-guide/analytics/attribution) for a full explanation.
 ### Attribution model
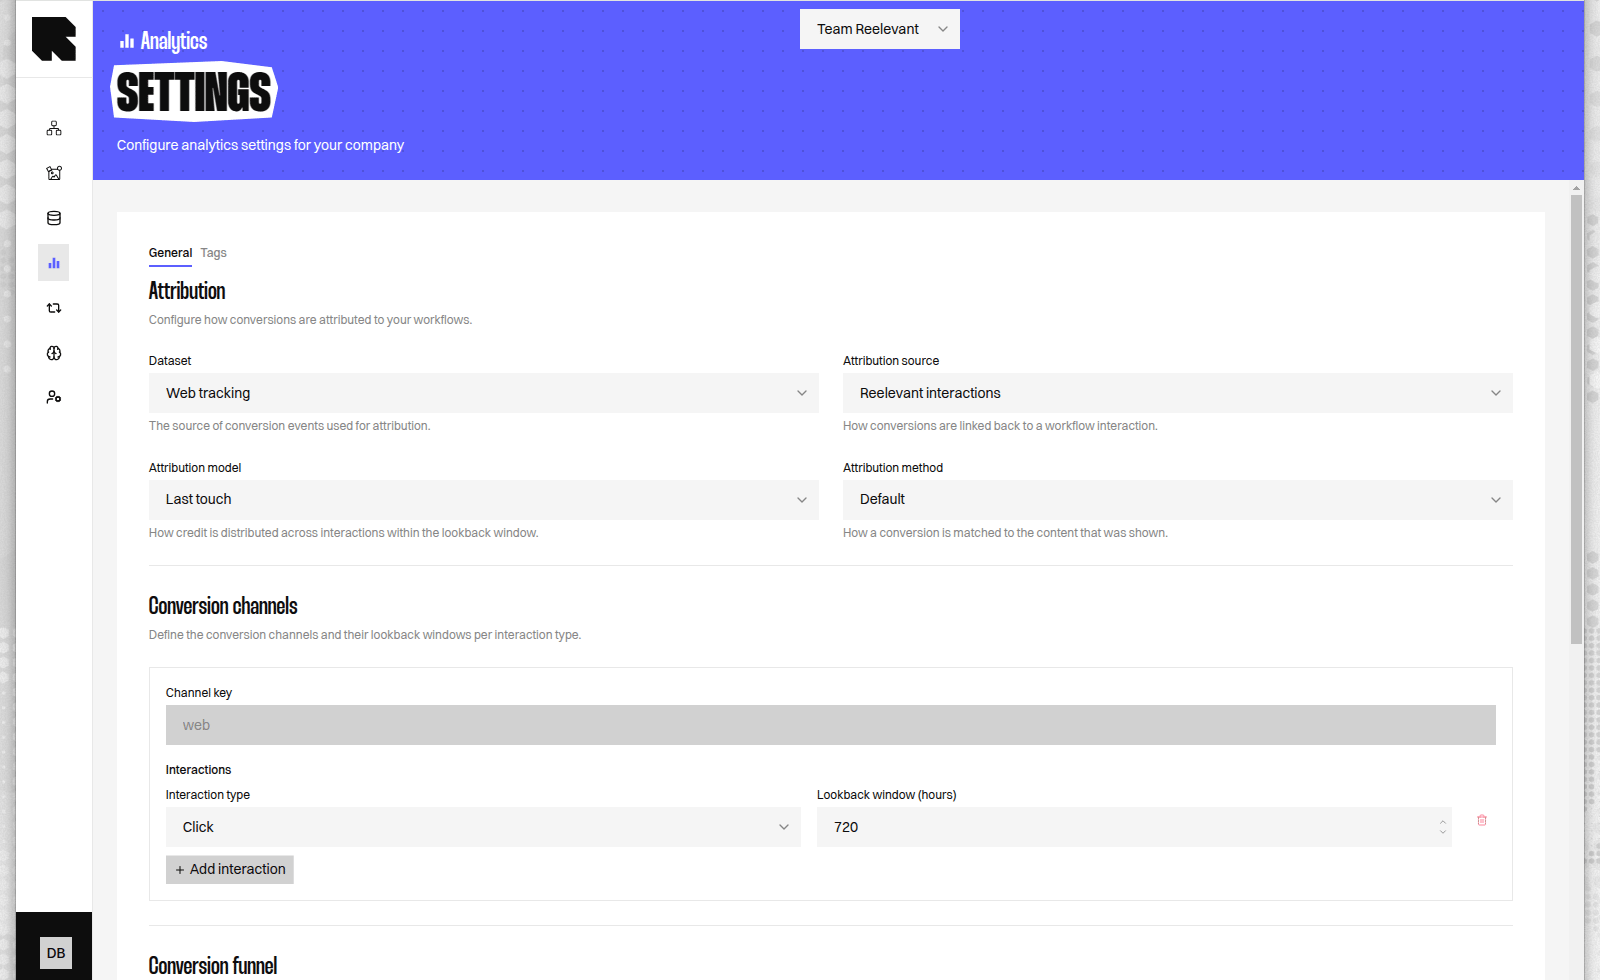
The model decides how credit is shared between the interactions that led to a purchase.
| Model | How it shares credit |
| ------------------------ | ---------------------------------------------------------------------------------------- |
| **Last-touch** (default) | The last interaction before the purchase receives all the credit. |
| **Linear** | Every interaction receives an equal share. |
| **Decay** | Interactions closer to the purchase receive more credit; the earliest receive the least. |
### Lookback windows
The lookback window is the time before a purchase during which an interaction can earn credit. You can set a different window for each interaction type.
| Field | Description |
| ------------------------------- | ------------------------------------------------------------------------------------------------- |
| **Click window (hours)** | Lookback for clicks on Reelevant content (e.g., 720 for 30 days). Leave empty to use the default. |
| **View-through window (hours)** | Lookback for display views (e.g., 168 for 7 days). Leave empty to use the default. |
### Configuring attribution
1. Navigate to **Analytics > Settings**.
2. Choose an **attribution model**.
3. Set the **lookback windows** for each interaction type.
4. Choose your **data source** (web tracking or customer purchases).
5. Click **Save**.
Changing attribution affects how conversions are counted in the [Conversions dashboard](/product-guide/analytics/dashboards/conversions) and [Data Exploration](/product-guide/analytics/data-exploration). A longer window captures more conversions but may include less directly attributable purchases.
## Personalisation exposure
These two thresholds decide which customers count as personalised in the [Customer Impact](/advanced-guide/analytics/customer-impact) dashboard. That dashboard and [Adoption](/advanced-guide/analytics/adoption) are both in beta and enabled on request, so you may not see them yet.
### Attribution model
The model decides how credit is shared between the interactions that led to a purchase.
| Model | How it shares credit |
| ------------------------ | ---------------------------------------------------------------------------------------- |
| **Last-touch** (default) | The last interaction before the purchase receives all the credit. |
| **Linear** | Every interaction receives an equal share. |
| **Decay** | Interactions closer to the purchase receive more credit; the earliest receive the least. |
### Lookback windows
The lookback window is the time before a purchase during which an interaction can earn credit. You can set a different window for each interaction type.
| Field | Description |
| ------------------------------- | ------------------------------------------------------------------------------------------------- |
| **Click window (hours)** | Lookback for clicks on Reelevant content (e.g., 720 for 30 days). Leave empty to use the default. |
| **View-through window (hours)** | Lookback for display views (e.g., 168 for 7 days). Leave empty to use the default. |
### Configuring attribution
1. Navigate to **Analytics > Settings**.
2. Choose an **attribution model**.
3. Set the **lookback windows** for each interaction type.
4. Choose your **data source** (web tracking or customer purchases).
5. Click **Save**.
Changing attribution affects how conversions are counted in the [Conversions dashboard](/product-guide/analytics/dashboards/conversions) and [Data Exploration](/product-guide/analytics/data-exploration). A longer window captures more conversions but may include less directly attributable purchases.
## Personalisation exposure
These two thresholds decide which customers count as personalised in the [Customer Impact](/advanced-guide/analytics/customer-impact) dashboard. That dashboard and [Adoption](/advanced-guide/analytics/adoption) are both in beta and enabled on request, so you may not see them yet.
 | Field | Default | What it does |
| ---------------------------------- | ------- | --------------------------------------------------------- |
| **Minimum personalized displays** | 2 | How many personalised Contents a customer must have seen. |
| **Minimum personalized share (%)** | 50 | How much of what they saw must be personalised. |
Customers above zero but below these thresholds count as neither personalised nor non-personalised. They stay out of the comparison.
1. Navigate to **Analytics > Settings**.
2. Scroll to **Personalization exposure** on the **General** tab.
3. Set the two thresholds, or leave them empty to keep the defaults.
4. Click **Save changes**.
Raise both thresholds when almost every Content you send is personalised. Lower them when only a few Contents are.
## Tags
Tags give each Branch controlled labels that your team can use consistently across Workflows and Analytics.
Each tag contains a **tag key** (the label to organise) and a list of **values**. For example, `Campaign objective` can contain `Acquisition` and `Retention`.
Only custom tags appear in this tab. Reelevant-managed tags are not editable.
### Understand cardinality
Cardinality controls how many values from one tag key can be assigned to the same Branch. It does not limit how many values you create.
| Field | Default | What it does |
| ---------------------------------- | ------- | --------------------------------------------------------- |
| **Minimum personalized displays** | 2 | How many personalised Contents a customer must have seen. |
| **Minimum personalized share (%)** | 50 | How much of what they saw must be personalised. |
Customers above zero but below these thresholds count as neither personalised nor non-personalised. They stay out of the comparison.
1. Navigate to **Analytics > Settings**.
2. Scroll to **Personalization exposure** on the **General** tab.
3. Set the two thresholds, or leave them empty to keep the defaults.
4. Click **Save changes**.
Raise both thresholds when almost every Content you send is personalised. Lower them when only a few Contents are.
## Tags
Tags give each Branch controlled labels that your team can use consistently across Workflows and Analytics.
Each tag contains a **tag key** (the label to organise) and a list of **values**. For example, `Campaign objective` can contain `Acquisition` and `Retention`.
Only custom tags appear in this tab. Reelevant-managed tags are not editable.
### Understand cardinality
Cardinality controls how many values from one tag key can be assigned to the same Branch. It does not limit how many values you create.
 | Cardinality | Behaviour in a Workflow | Example |
| ------------ | ---------------------------------------------------------- | ------------------------------------------------------------------------------------------------------------- |
| **Single** | Each final Branch resolves to one value from this tag key. | `Campaign objective: Retention` cannot be combined with `Campaign objective: Acquisition` on the same Branch. |
| **Multiple** | Each final Branch keeps every value assigned along it. | `Audience context: Birthday` and `Audience context: Loyalty` can both describe the same Branch. |
**Most downstream** means closest to the [Output Node](/glossary).
Imagine one Workflow qualifies `Campaign objective: Acquisition` before a second Logic Node.
A later qualification on the same final Branch assigns `Campaign objective: Retention`. Analytics uses `Retention` because it is closer to the Output Node.
With **Multiple** cardinality, both values remain attached to the final Branch.
Choose **Single** when one downstream value should replace earlier values. Choose **Multiple** when every matching value should remain available.
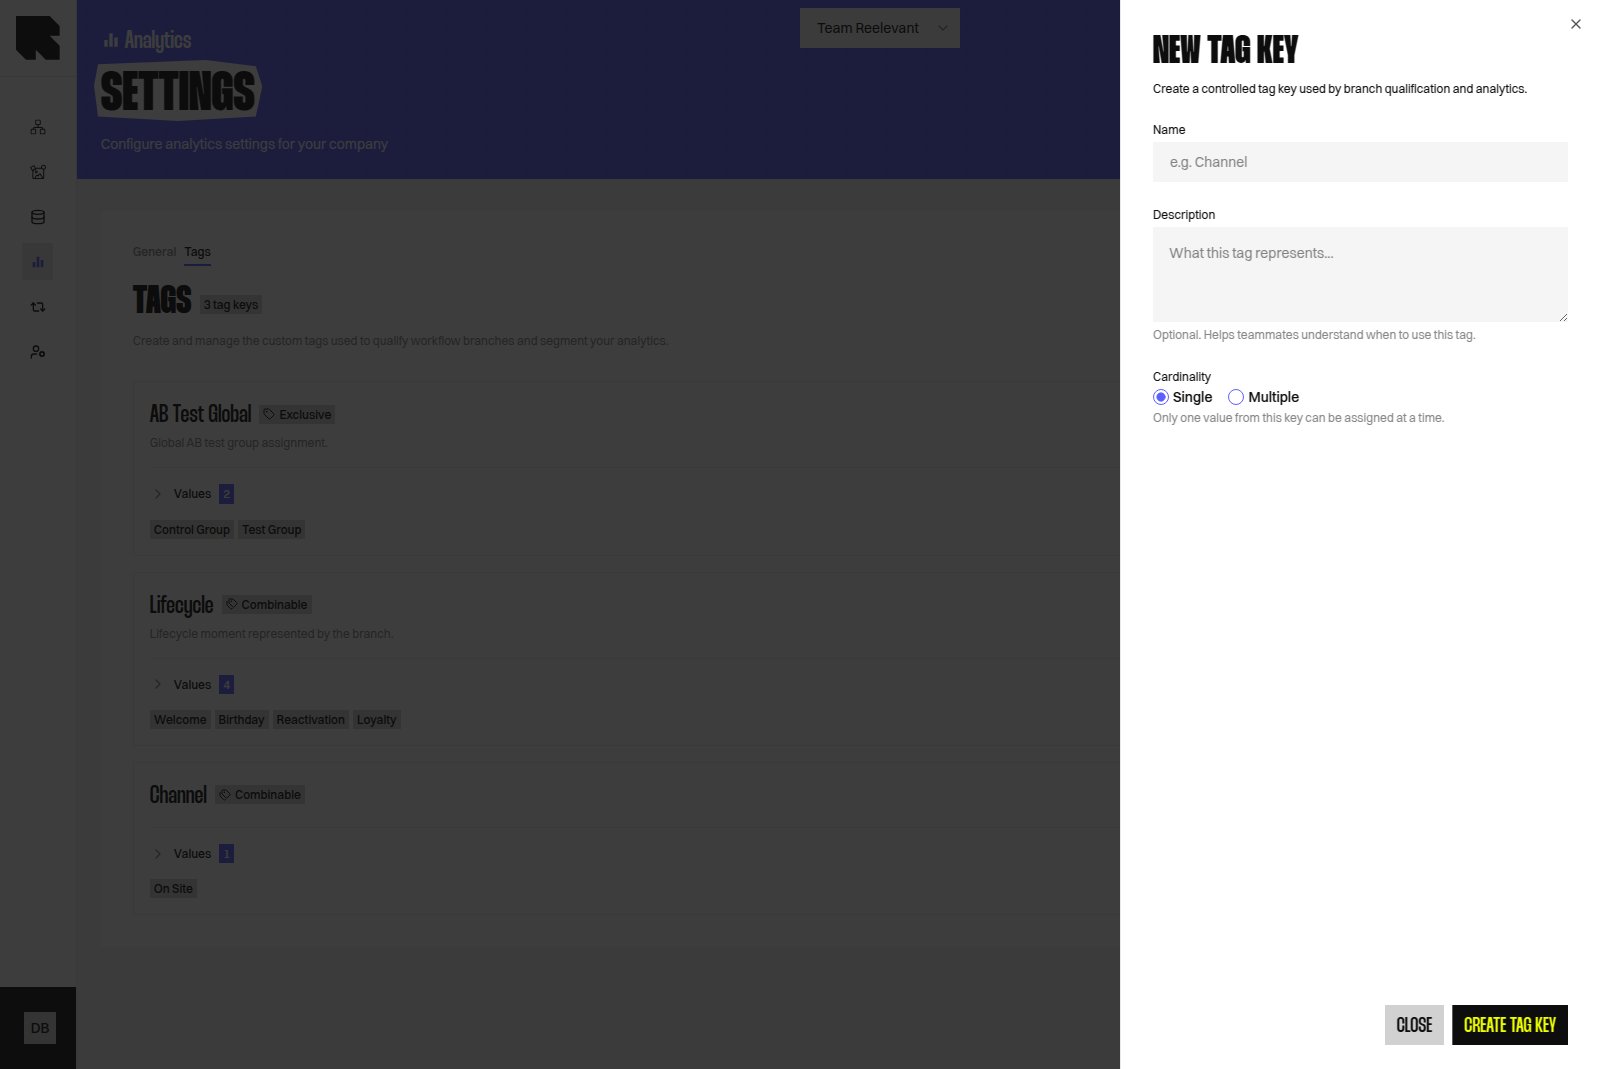
### Create a tag key
1. Navigate to **Analytics > Settings**.
2. Select **Tags**.
3. Click **Add tag**.
4. Enter a unique **Name**.
5. Add an optional **Description** to help teammates use the tag correctly.
6. Choose **Single** or **Multiple** under **Cardinality**.
7. Click **Create tag key**.
Tag key names must be unique. The platform ignores capitalisation and leading or trailing spaces when checking names.
### Add values
1. Find the tag key.
2. Click the plus icon beside **Values**.
3. Enter a unique value name and an optional description.
4. Click **Add value**.
Value names must be unique within their tag key. You can expand **Values** to review every available choice.
The platform also ignores capitalisation and leading or trailing spaces when checking value names.
### Edit or delete tags
Use the pencil icon to change a tag key, its description, or its cardinality.
Expand **Values**, then use each value's action icons to edit or delete it.
Deleting a tag key also deletes all its values. Deleted tag keys and values cannot be restored.
### Use tags in Workflows and Analytics
Created tags become available when you [qualify a Branch](/product-guide/workflows/branches). Users select controlled values but cannot create new ones there.
In Analytics, use tag keys and values to filter results or compare performance across your qualification choices.
## What's Next?
Assign your controlled tag values while qualifying Branches.
Filter and compare performance with your tag keys.
Understand how Reelevant credits revenue to content interactions.
| Cardinality | Behaviour in a Workflow | Example |
| ------------ | ---------------------------------------------------------- | ------------------------------------------------------------------------------------------------------------- |
| **Single** | Each final Branch resolves to one value from this tag key. | `Campaign objective: Retention` cannot be combined with `Campaign objective: Acquisition` on the same Branch. |
| **Multiple** | Each final Branch keeps every value assigned along it. | `Audience context: Birthday` and `Audience context: Loyalty` can both describe the same Branch. |
**Most downstream** means closest to the [Output Node](/glossary).
Imagine one Workflow qualifies `Campaign objective: Acquisition` before a second Logic Node.
A later qualification on the same final Branch assigns `Campaign objective: Retention`. Analytics uses `Retention` because it is closer to the Output Node.
With **Multiple** cardinality, both values remain attached to the final Branch.
Choose **Single** when one downstream value should replace earlier values. Choose **Multiple** when every matching value should remain available.
### Create a tag key
1. Navigate to **Analytics > Settings**.
2. Select **Tags**.
3. Click **Add tag**.
4. Enter a unique **Name**.
5. Add an optional **Description** to help teammates use the tag correctly.
6. Choose **Single** or **Multiple** under **Cardinality**.
7. Click **Create tag key**.
Tag key names must be unique. The platform ignores capitalisation and leading or trailing spaces when checking names.
### Add values
1. Find the tag key.
2. Click the plus icon beside **Values**.
3. Enter a unique value name and an optional description.
4. Click **Add value**.
Value names must be unique within their tag key. You can expand **Values** to review every available choice.
The platform also ignores capitalisation and leading or trailing spaces when checking value names.
### Edit or delete tags
Use the pencil icon to change a tag key, its description, or its cardinality.
Expand **Values**, then use each value's action icons to edit or delete it.
Deleting a tag key also deletes all its values. Deleted tag keys and values cannot be restored.
### Use tags in Workflows and Analytics
Created tags become available when you [qualify a Branch](/product-guide/workflows/branches). Users select controlled values but cannot create new ones there.
In Analytics, use tag keys and values to filter results or compare performance across your qualification choices.
## What's Next?
Assign your controlled tag values while qualifying Branches.
Filter and compare performance with your tag keys.
Understand how Reelevant credits revenue to content interactions.