> ## Documentation Index
> Fetch the complete documentation index at: https://docs.reelevant.com/llms.txt
> Use this file to discover all available pages before exploring further.
# Overview
> Define where your personalized content is displayed by adding channel nodes to your workflow
 ## What are Channels?
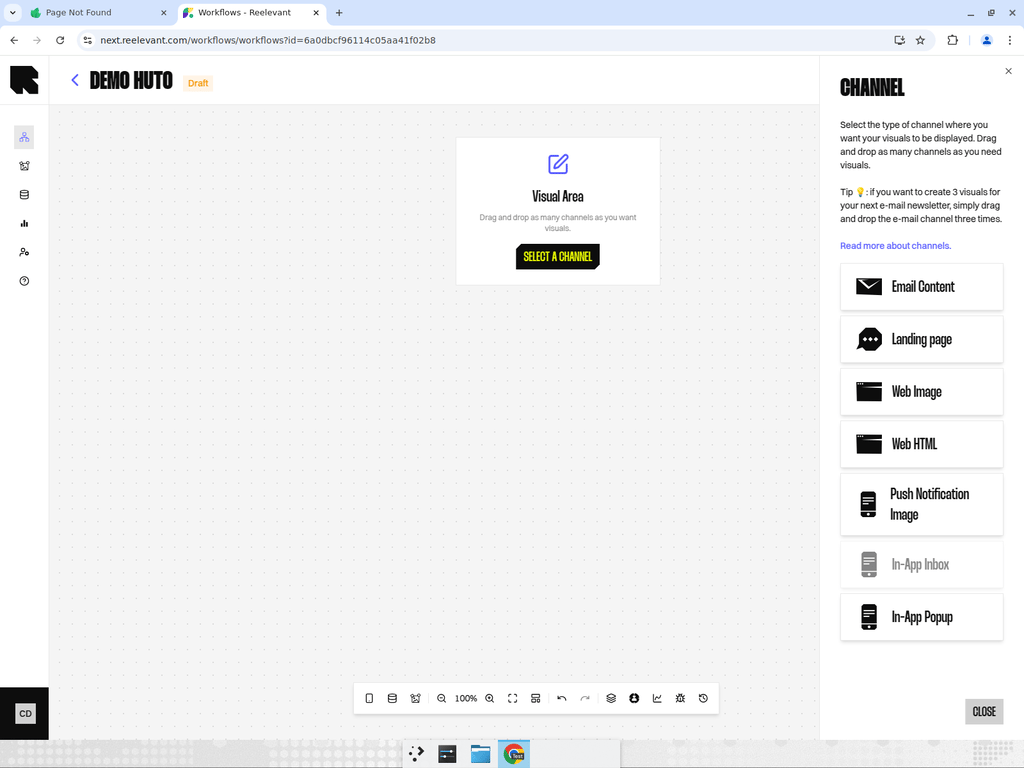
Channels are the starting nodes of a workflow. They define **where** the personalized content will be displayed — in an email, on a website, in a mobile app, or on a landing page.
Every workflow branch starts with a channel node and ends with an [output node](/product-guide/workflows/output-nodes).
You can have **multiple channels** in a single workflow. For example, if your email newsletter has three personalized visual zones, simply add three Email channel nodes — one for each zone.
## Available Channel Types
Renders a personalized visual for inclusion in email campaigns.
Renders a personalized image for display on websites.
Renders a responsive HTML partial for embedding in web pages.
Generates a full landing page experience.
Renders a personalized image for push notifications.
Renders a personalized image for in-app popup overlays.
Renders a personalized image for the in-app inbox/message center.
## Messaging Channels
RCS and WhatsApp messages also carry personalised Reelevant content. Each has its own Channel, and you hand the resulting link to your messaging platform.
How messaging platforms display Reelevant content, and who owns what.
Personalised carousels and cards in RCS conversations.
Personalised visuals inside WhatsApp Business messages.
## Adding a Channel
Click the **Channel** button (smartphone icon) in the bottom toolbar. The entry picker drawer opens on the side.
Choose the desired channel type from the list. You can either click to add it directly or drag and drop it onto the canvas.
The channel node appears on the canvas. Connect it downstream to [data nodes](/product-guide/workflows/data-nodes), [logic nodes](/product-guide/workflows/logic-nodes), and eventually to an [output node](/product-guide/workflows/output-nodes) to complete the branch.
## Tips
* Each channel node represents one **visual zone** in your final deployment. If you need three banners in an email, add three Email channels.
* Channels can share downstream data and logic nodes — you don't need to duplicate the entire flow for each channel.
* After publishing, each channel generates its own integration link in the [Integration modal](/product-guide/workflows/integration).
## What are Channels?
Channels are the starting nodes of a workflow. They define **where** the personalized content will be displayed — in an email, on a website, in a mobile app, or on a landing page.
Every workflow branch starts with a channel node and ends with an [output node](/product-guide/workflows/output-nodes).
You can have **multiple channels** in a single workflow. For example, if your email newsletter has three personalized visual zones, simply add three Email channel nodes — one for each zone.
## Available Channel Types
Renders a personalized visual for inclusion in email campaigns.
Renders a personalized image for display on websites.
Renders a responsive HTML partial for embedding in web pages.
Generates a full landing page experience.
Renders a personalized image for push notifications.
Renders a personalized image for in-app popup overlays.
Renders a personalized image for the in-app inbox/message center.
## Messaging Channels
RCS and WhatsApp messages also carry personalised Reelevant content. Each has its own Channel, and you hand the resulting link to your messaging platform.
How messaging platforms display Reelevant content, and who owns what.
Personalised carousels and cards in RCS conversations.
Personalised visuals inside WhatsApp Business messages.
## Adding a Channel
Click the **Channel** button (smartphone icon) in the bottom toolbar. The entry picker drawer opens on the side.
Choose the desired channel type from the list. You can either click to add it directly or drag and drop it onto the canvas.
The channel node appears on the canvas. Connect it downstream to [data nodes](/product-guide/workflows/data-nodes), [logic nodes](/product-guide/workflows/logic-nodes), and eventually to an [output node](/product-guide/workflows/output-nodes) to complete the branch.
## Tips
* Each channel node represents one **visual zone** in your final deployment. If you need three banners in an email, add three Email channels.
* Channels can share downstream data and logic nodes — you don't need to duplicate the entire flow for each channel.
* After publishing, each channel generates its own integration link in the [Integration modal](/product-guide/workflows/integration).