> ## Documentation Index
> Fetch the complete documentation index at: https://docs.reelevant.com/llms.txt
> Use this file to discover all available pages before exploring further.
# Workflow Editor
> Navigate and use the visual workflow editor to build your automation logic
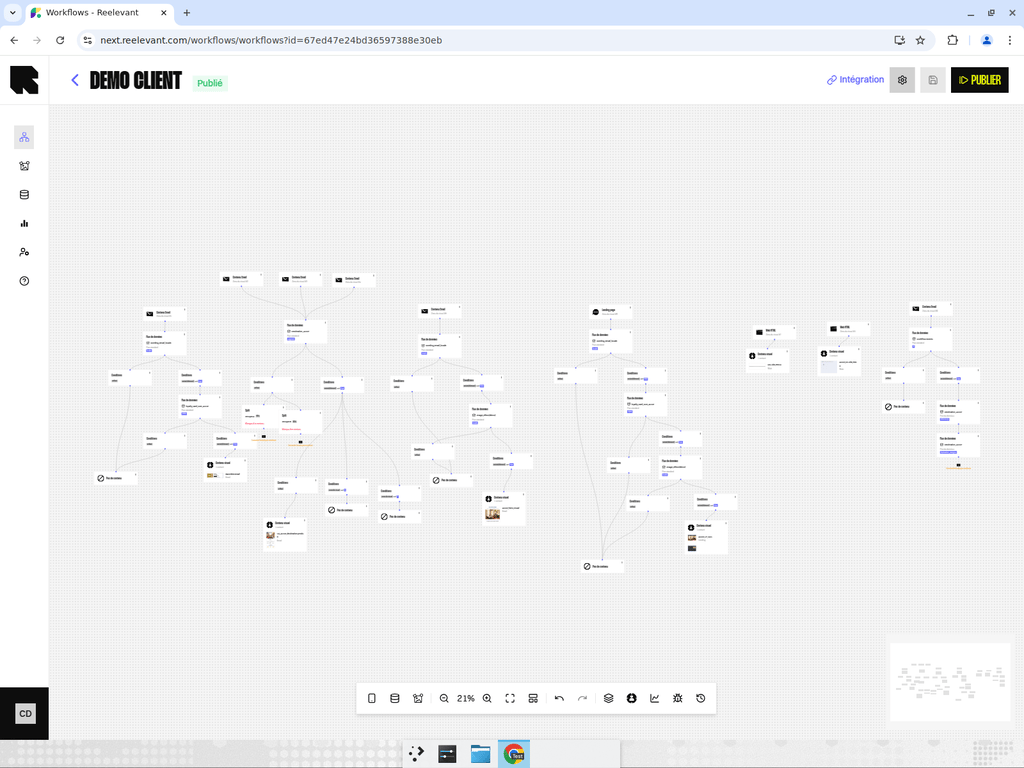 ## Editor Layout
The workflow editor is a full-screen, visual canvas where you build your workflow by adding and connecting nodes. It consists of three main areas:
1. **Header bar** — Displays the workflow name, status badge, and action buttons (Settings, Save, Publish, Use).
2. **Canvas** — The main interactive area where nodes are displayed as a flow diagram. You can pan, zoom, and drag nodes around.
3. **Bottom toolbar** — A menu bar at the bottom of the canvas with tools for adding nodes, zooming, undo/redo, and more.
## Header Actions
The editor header provides quick access to key workflow operations:
| Action | Description |
| ------------------------ | --------------------------------------------------------------------------------------------------------------------------- |
| **Back arrow** | Navigate back to the workflow listing. |
| **Settings** (gear icon) | Edit the workflow name, description, teams, and folder. |
| **Save** | Save the current draft without publishing. Only enabled when there are unsaved changes. |
| **Publish** | Validate and publish the workflow to make it live. See [Publishing](#publishing-a-workflow). |
| **Use** | Open the [Integration modal](/product-guide/workflows/integration) to get deployment links (only available when published). |
## Bottom Toolbar
The bottom toolbar is organized into sections:
### Adding Nodes
| Tool | Description |
| ----------------------------- | -------------------------------------------------------------------------------------------------------------------------------------------------------------------------------------------------------------------------------------------------------- |
| **Channel** (smartphone icon) | Open the channel picker to add a [channel](/product-guide/workflows/channels) node. |
| **Data** (database icon) | Hover to reveal the [data node](/product-guide/workflows/data-nodes) menu — datasources, URL parameters, geolocation, weather, transforms, etc. |
| **Output** (content icon) | Open the content types drawer to add [visual content](/product-guide/workflows/output-nodes/visual-content), [JSON template](/product-guide/workflows/output-nodes/json-template), or [empty](/product-guide/workflows/output-nodes/empty) output nodes. |
### Canvas Navigation
| Tool | Description |
| ---------------------- | -------------------------------------------------------------------------------------------------- |
| **Zoom out / Zoom in** | Adjust the zoom level of the canvas. The current zoom percentage is displayed between the buttons. |
| **Fit to screen** | Auto-zoom to fit all nodes within the viewport. |
| **Auto-layout** | Automatically arrange all nodes in a clean, readable layout. |
### History
| Tool | Description |
| -------- | -------------------------------- |
| **Undo** | Revert the last action. |
| **Redo** | Re-apply the last undone action. |
### View Modes
| Tool | Description |
| --------------------------- | ----------------------------------------------------------------------------------------------- |
| **Nested nodes** | Open a drawer listing nodes that aren't visible on the main canvas (nested inside other nodes). |
| **Individualized branches** | Toggle highlighting of branches that deliver personalized content. |
| **Statistics mode** | Switch between editor and statistics view to see traffic distribution across branches. |
| **Debug mode** | Toggle debug information on nodes (execution times, node IDs). |
| **AI Copilot** | Open the Simone AI assistant panel (if enabled for your account). |
| **Versions** | Open the [version history](/product-guide/workflows/versions) drawer. |
| **Generate documentation** | Auto-generate business or technical documentation for the current workflow. |
## Working with Nodes
### Adding Nodes
There are several ways to add nodes:
1. **Toolbar** — Use the bottom toolbar buttons to add channels, data nodes, or outputs.
2. **Context menu** — Right-click on the canvas or on an existing node for contextual actions.
3. **Drag and drop** — Drag node types from the picker drawers onto the canvas.
### Connecting Nodes
Nodes have **connection handles** (small circles on their edges). To connect two nodes:
1. Click and drag from a handle on one node.
2. Drop on the handle of another node.
3. An edge (arrow) appears connecting them.
### Configuring Nodes
Click on any node to open its **configuration drawer** on the right side of the canvas. The configuration options vary depending on the node type — see the dedicated pages for [channels](/product-guide/workflows/channels), [data nodes](/product-guide/workflows/data-nodes), [logic nodes](/product-guide/workflows/logic-nodes), and [output nodes](/product-guide/workflows/output-nodes).
### Context Menu Actions
Right-click on a node to access:
* **Edit** — Open the configuration drawer.
* **Duplicate** — Create a copy of the node.
* **Delete** — Remove the node and its connections.
* **Add documentation** — Attach a documentation note to the node.
* **Create branches** — Add a logic node downstream.
* **Use data** — Add a data node downstream.
* **Add content** — Add an output node downstream.
Right-click on an edge to:
* **Delete** — Remove the connection between two nodes.
* **Qualify branch** — Assign a branch category to this path.
## Publishing a Workflow
Before a workflow can serve content, it must be published:
Click the **Publish** button in the header.
The system validates the workflow for common errors:
* Missing channels
* Missing outputs
* Circular dependencies
* Invalid node configurations
* Content bindings errors
If errors are found, a notification appears and the canvas focuses on the first problematic node.
If validation passes, the workflow is saved and published in one step. The status badge changes to **Published**.
Publishing overwrites the currently live version. The previous version is preserved in the [version history](/product-guide/workflows/versions).
## Editor Layout
The workflow editor is a full-screen, visual canvas where you build your workflow by adding and connecting nodes. It consists of three main areas:
1. **Header bar** — Displays the workflow name, status badge, and action buttons (Settings, Save, Publish, Use).
2. **Canvas** — The main interactive area where nodes are displayed as a flow diagram. You can pan, zoom, and drag nodes around.
3. **Bottom toolbar** — A menu bar at the bottom of the canvas with tools for adding nodes, zooming, undo/redo, and more.
## Header Actions
The editor header provides quick access to key workflow operations:
| Action | Description |
| ------------------------ | --------------------------------------------------------------------------------------------------------------------------- |
| **Back arrow** | Navigate back to the workflow listing. |
| **Settings** (gear icon) | Edit the workflow name, description, teams, and folder. |
| **Save** | Save the current draft without publishing. Only enabled when there are unsaved changes. |
| **Publish** | Validate and publish the workflow to make it live. See [Publishing](#publishing-a-workflow). |
| **Use** | Open the [Integration modal](/product-guide/workflows/integration) to get deployment links (only available when published). |
## Bottom Toolbar
The bottom toolbar is organized into sections:
### Adding Nodes
| Tool | Description |
| ----------------------------- | -------------------------------------------------------------------------------------------------------------------------------------------------------------------------------------------------------------------------------------------------------- |
| **Channel** (smartphone icon) | Open the channel picker to add a [channel](/product-guide/workflows/channels) node. |
| **Data** (database icon) | Hover to reveal the [data node](/product-guide/workflows/data-nodes) menu — datasources, URL parameters, geolocation, weather, transforms, etc. |
| **Output** (content icon) | Open the content types drawer to add [visual content](/product-guide/workflows/output-nodes/visual-content), [JSON template](/product-guide/workflows/output-nodes/json-template), or [empty](/product-guide/workflows/output-nodes/empty) output nodes. |
### Canvas Navigation
| Tool | Description |
| ---------------------- | -------------------------------------------------------------------------------------------------- |
| **Zoom out / Zoom in** | Adjust the zoom level of the canvas. The current zoom percentage is displayed between the buttons. |
| **Fit to screen** | Auto-zoom to fit all nodes within the viewport. |
| **Auto-layout** | Automatically arrange all nodes in a clean, readable layout. |
### History
| Tool | Description |
| -------- | -------------------------------- |
| **Undo** | Revert the last action. |
| **Redo** | Re-apply the last undone action. |
### View Modes
| Tool | Description |
| --------------------------- | ----------------------------------------------------------------------------------------------- |
| **Nested nodes** | Open a drawer listing nodes that aren't visible on the main canvas (nested inside other nodes). |
| **Individualized branches** | Toggle highlighting of branches that deliver personalized content. |
| **Statistics mode** | Switch between editor and statistics view to see traffic distribution across branches. |
| **Debug mode** | Toggle debug information on nodes (execution times, node IDs). |
| **AI Copilot** | Open the Simone AI assistant panel (if enabled for your account). |
| **Versions** | Open the [version history](/product-guide/workflows/versions) drawer. |
| **Generate documentation** | Auto-generate business or technical documentation for the current workflow. |
## Working with Nodes
### Adding Nodes
There are several ways to add nodes:
1. **Toolbar** — Use the bottom toolbar buttons to add channels, data nodes, or outputs.
2. **Context menu** — Right-click on the canvas or on an existing node for contextual actions.
3. **Drag and drop** — Drag node types from the picker drawers onto the canvas.
### Connecting Nodes
Nodes have **connection handles** (small circles on their edges). To connect two nodes:
1. Click and drag from a handle on one node.
2. Drop on the handle of another node.
3. An edge (arrow) appears connecting them.
### Configuring Nodes
Click on any node to open its **configuration drawer** on the right side of the canvas. The configuration options vary depending on the node type — see the dedicated pages for [channels](/product-guide/workflows/channels), [data nodes](/product-guide/workflows/data-nodes), [logic nodes](/product-guide/workflows/logic-nodes), and [output nodes](/product-guide/workflows/output-nodes).
### Context Menu Actions
Right-click on a node to access:
* **Edit** — Open the configuration drawer.
* **Duplicate** — Create a copy of the node.
* **Delete** — Remove the node and its connections.
* **Add documentation** — Attach a documentation note to the node.
* **Create branches** — Add a logic node downstream.
* **Use data** — Add a data node downstream.
* **Add content** — Add an output node downstream.
Right-click on an edge to:
* **Delete** — Remove the connection between two nodes.
* **Qualify branch** — Assign a branch category to this path.
## Publishing a Workflow
Before a workflow can serve content, it must be published:
Click the **Publish** button in the header.
The system validates the workflow for common errors:
* Missing channels
* Missing outputs
* Circular dependencies
* Invalid node configurations
* Content bindings errors
If errors are found, a notification appears and the canvas focuses on the first problematic node.
If validation passes, the workflow is saved and published in one step. The status badge changes to **Published**.
Publishing overwrites the currently live version. The previous version is preserved in the [version history](/product-guide/workflows/versions).