> ## Documentation Index
> Fetch the complete documentation index at: https://docs.reelevant.com/llms.txt
> Use this file to discover all available pages before exploring further.
# Integration & Deployment
> Deploy your published workflows by configuring URL parameters, variable profiles, and integration links
 ## Overview
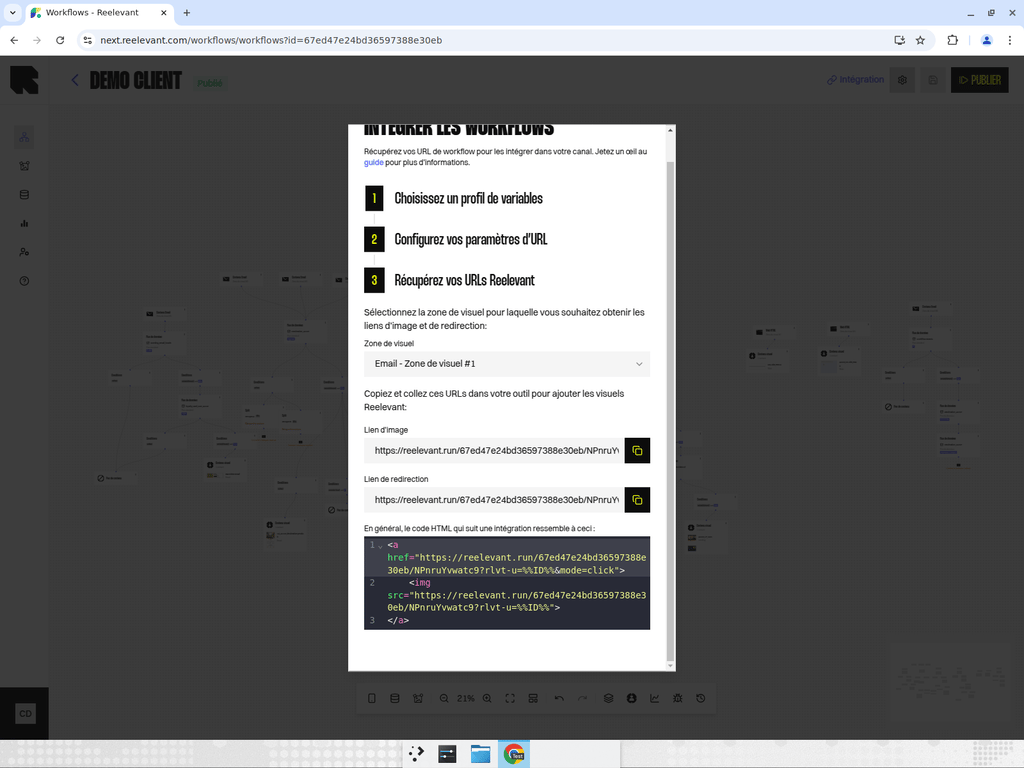
Once a workflow is **published**, you can deploy it by generating integration links. The integration process is a guided, step-by-step flow accessible from the **Use** button in the workflow editor header.
## Integration Steps
The integration modal walks you through up to three steps:
### Step 1: Variable Profile Selection
If your account has **variable profiles** configured (see [Workflow Settings](/product-guide/workflows/settings)), you'll first select which profile to use.
A variable profile is a pre-configured set of URL parameters (such as UTM tags and tracking identifiers) that are automatically appended to your integration links.
* Choose a profile from the dropdown list.
* If no profiles are configured, this step is skipped automatically.
* If the workflow already has a profile assigned, you can change it or proceed with the current one.
### Step 2: URL Parameters Configuration
Configure the URL parameters that will be passed to the workflow at runtime. These parameters provide context that the workflow uses for personalization.
Common parameters include:
* **User identifier** — To match the visitor with their profile data.
* **Campaign ID** — To associate the interaction with a specific campaign.
* **Custom parameters** — Any URL parameters defined in your workflow's [URL Parameter nodes](/product-guide/workflows/data-nodes/url-parameter).
For each parameter, specify:
* **Parameter name** — Must match the name used in the workflow.
* **Value source** — How the value is provided (e.g., dynamically by your ESP, hardcoded, etc.).
### Step 3: Integration Links
The final step provides the actual links to embed in your campaigns.
Each [channel](/product-guide/workflows/channels) in your workflow generates its own integration link. The links are displayed with:
* **Channel type** — Which channel this link corresponds to.
* **Integration URL** — The full URL to embed in your email, website, or app.
* **Copy button** — One-click copy for easy pasting into your tools.
## Integration Link Types
Depending on the channel type, you'll receive different integration formats:
| Channel | Format | How to Use |
| ---------------- | ----------------------- | ------------------------------------------------ |
| **Email** | Image URL (`
## Overview
Once a workflow is **published**, you can deploy it by generating integration links. The integration process is a guided, step-by-step flow accessible from the **Use** button in the workflow editor header.
## Integration Steps
The integration modal walks you through up to three steps:
### Step 1: Variable Profile Selection
If your account has **variable profiles** configured (see [Workflow Settings](/product-guide/workflows/settings)), you'll first select which profile to use.
A variable profile is a pre-configured set of URL parameters (such as UTM tags and tracking identifiers) that are automatically appended to your integration links.
* Choose a profile from the dropdown list.
* If no profiles are configured, this step is skipped automatically.
* If the workflow already has a profile assigned, you can change it or proceed with the current one.
### Step 2: URL Parameters Configuration
Configure the URL parameters that will be passed to the workflow at runtime. These parameters provide context that the workflow uses for personalization.
Common parameters include:
* **User identifier** — To match the visitor with their profile data.
* **Campaign ID** — To associate the interaction with a specific campaign.
* **Custom parameters** — Any URL parameters defined in your workflow's [URL Parameter nodes](/product-guide/workflows/data-nodes/url-parameter).
For each parameter, specify:
* **Parameter name** — Must match the name used in the workflow.
* **Value source** — How the value is provided (e.g., dynamically by your ESP, hardcoded, etc.).
### Step 3: Integration Links
The final step provides the actual links to embed in your campaigns.
Each [channel](/product-guide/workflows/channels) in your workflow generates its own integration link. The links are displayed with:
* **Channel type** — Which channel this link corresponds to.
* **Integration URL** — The full URL to embed in your email, website, or app.
* **Copy button** — One-click copy for easy pasting into your tools.
## Integration Link Types
Depending on the channel type, you'll receive different integration formats:
| Channel | Format | How to Use |
| ---------------- | ----------------------- | ------------------------------------------------ |
| **Email** | Image URL (`![]() ` tag) | Paste as an image source in your email template. |
| **Web Image** | Image URL | Embed as an image source on your website. |
| **Web HTML** | Script tag or iframe | Include the HTML snippet on your web page. |
| **Landing Page** | Full page URL | Link to this URL from your emails or ads. |
| **Mobile** | API endpoint | Call from your mobile app SDK. |
## Accessing Integration Links
There are two ways to open the integration modal:
1. **From the editor** — Click the **Use** button (link icon) in the workflow editor header. Only available when the workflow status is **Published**.
2. **From the listing** — Use the actions menu on a published workflow in the listing table.
## Tips
* Always configure URL parameters **before** generating integration links — the links include your parameter configuration.
* Test your integration links in a staging environment before deploying to production.
* If you update and re-publish the workflow, existing integration links continue to work — they automatically serve the latest published version.
* Variable profiles save time when you have a standard set of tracking parameters used across multiple workflows.
` tag) | Paste as an image source in your email template. |
| **Web Image** | Image URL | Embed as an image source on your website. |
| **Web HTML** | Script tag or iframe | Include the HTML snippet on your web page. |
| **Landing Page** | Full page URL | Link to this URL from your emails or ads. |
| **Mobile** | API endpoint | Call from your mobile app SDK. |
## Accessing Integration Links
There are two ways to open the integration modal:
1. **From the editor** — Click the **Use** button (link icon) in the workflow editor header. Only available when the workflow status is **Published**.
2. **From the listing** — Use the actions menu on a published workflow in the listing table.
## Tips
* Always configure URL parameters **before** generating integration links — the links include your parameter configuration.
* Test your integration links in a staging environment before deploying to production.
* If you update and re-publish the workflow, existing integration links continue to work — they automatically serve the latest published version.
* Variable profiles save time when you have a standard set of tracking parameters used across multiple workflows.